
Was at a client before sunrise this morning. This is what I walked out to when I was done. I love the morning!
Viewing the uptime of your Untangle server
If you’re curious how long it’s been since the last reboot of your Untangle server, simply log in to the web administration gui and hover your mouse over the CPU Load box at the top of the rack. It will have a small pop up box giving you the current system uptime, as well as some additional system info.

Crock Pot Italian Beef Sandwiches
This is a crock pot recipe I’ve been making for years, and love it. I don’t remember where I originally got it, but I believe a friend gave it to me. I’ve made plenty of adjustments to it over the years to get it pretty much perfect.
I usually get a 3lb roast, as that feeds 4 easily and gives me a couple of days of lunch left overs. It reheats great, and sometimes is even a little bit better.
Prepare time: 10 – 15 minutes
Cook time: Approximately 8 hours
Ingredients
2 1/2 – 3 1/2 lb beef roast
Olive Oil
3 cups Au Jus
2 cloves minced garlic
Salt and Pepper
1/4 tsp Crushed Red Pepper flakes
1/2 tsp Garlic Powder
1/2 tsp Onion Powder
1 tbsp Basil Leaves
1 tbsp Parsley Flakes
1 tbsp Oregano Leaves
2 Bay Leaves
1 jar (12 – 18oz) Pepperoncinis
Rolls (I prefer French style rolls)
Optional Ingredients
Cheese (I prefer chedder or pepper jack)
Hot Giardiniera
Mushrooms (sometimes I slice up mushrooms and add them to the crock pot. They’re pretty tasty on the sandwich)
Directions
Turn the crock pot on low
Coat the bottom of the crock pot with olive oil
Place the roast in to the crock pot
Cover the roast with all the dry ingredients (salt, pepper, red pepper flakes, garlic powder, onion powder, basil, parsley, and oregano)
Pour the Au Jus around the roast (Usually a 1/3 to 1/2 of the roast will still be exposed and that is ok)
Add the garlic to the juice around the roast
Add the 2 bay leaves to the juice
Put the cover on the crock pot and just let it cook. In about an hour your house will start smelling awesome!
A couple of hours before it’s done (usually around the 6 hour mark) I then pour in the entire jar of pepperoncini’s, juice and all. Be sure to remove the stems of the peppers if you plan to eat them,
After around 8 hours the roast should be done and will just pull apart using some tongs.
Sandwiches
I love to split the rolls in half and butter the insides, then I throw them under the broiler for a couple of minutes. Then just load a bunch of beef on the roll and serve. Of course be sure to add some additional toppings. Cheeses that work well are cheddar or pepper jack. Don’t forget some hot giardiniera to get that authentic hot italian beef taste.
Photos

The dry ingredients I use.

This is the Au Jus I use. It is 1 cup, but gets mixed with 2 parts water (for a total of 3 cups)
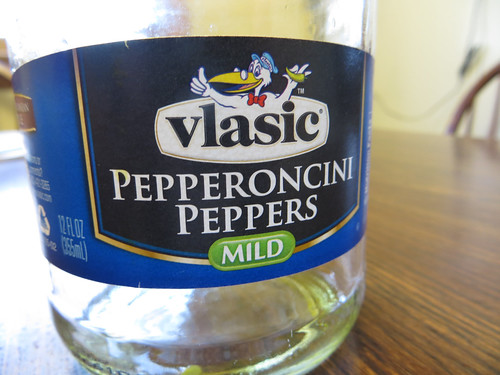
These were the pepperoncinis I used for the last beef I made.

By far my favorite rolls for the beef sandwiches. They can take a good soak’n of Au Jus without falling apart.
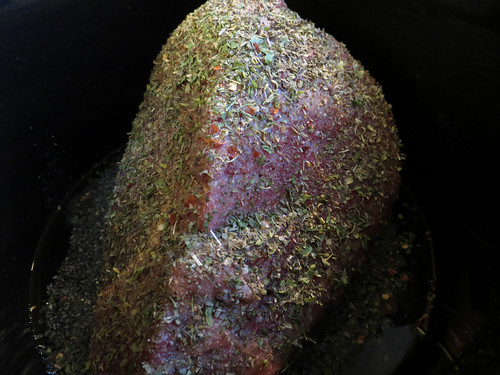
The raw roast covered in the dry seasonings.

After 4-6 hours I add the jar of pepperoncinis.
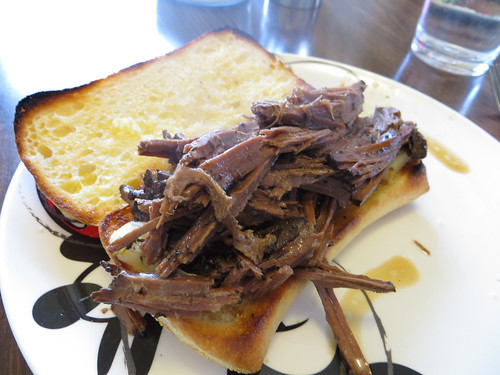
Beef on the toasted rolls. (Under the broiler just a tough too long)
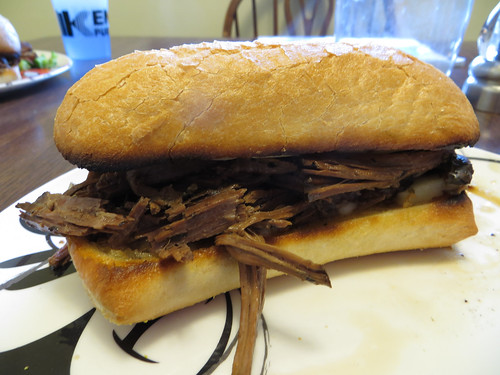
Finished sandwich with some pepper jack cheese.
Briefly unavailable for scheduled maintenance. Check back in a minute.
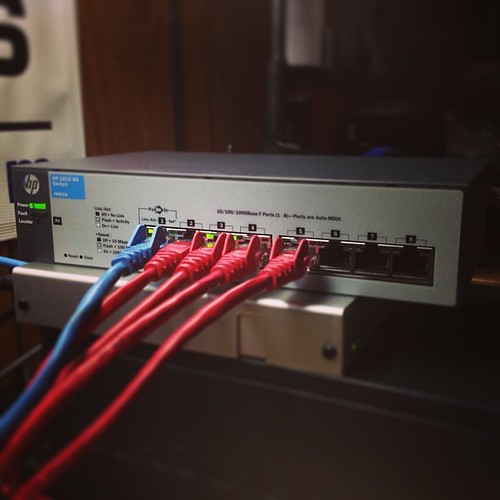
HP Procurve 1810-8G v2
ShadowProtect saves the day…again
The other day I got a call from someone with a non booting computer. User was concerned because of course, they didn’t have a recent backup of the main application they use to run their business. Since I knew there was critical data, my first process before troubleshooting the issue is to pull the drive and hook it up to the bench computer in my shop and attempt data access. I was able to access the drive without issue and quickly backed up the application data. Once I had that, I used Storagecraft ShadowProtect to create a full image backup of the drive.
Then I placed the drive back in the computer and powered it up to see what I got. I was quickly presented with a ‘Missing operating system’ message and that’s it. I then booted to an XP CD in repair mode and ran FIXMBR (which didn’t work), then also ran a CHKDSK (also which didn’t help).
On a whim, from my bench computer I attempted a virtual boot of the backup image I had created earlier. Much to my surprise, Windows booted to the login screen. Interesting. I couldn’t log in though because of activation issues (Thanks Microsoft). But based on that successful boot up I wanted to try something. I grabbed an old hard drive that I had laying around and performed a restoration of the image to that drive. I did choose to install a new MBR though. Once completed, I hooked that drive up the computer, and to an even bigger surprise, Windows completed booted up AND allowed me to log in. With the machine looking to me as if it is running again, I had the customer come in and verify everything worked. He was ecstatic when he saw all his data in the app.
ShadowProtect from Storagecraft is an awesome program for backups. I use it in my office and at many clients to backup critical systems and servers. It’s saved the day more than once.
Would you like to learn more about backing up your computer systems with ShadowProtect? Please contact me at Badger IT Solutions, LLC and we can discuss backup strategies for your personal and business computer systems.
Manually updating Malwarebytes
For as easy as this process really is, I don’t know why it’s not easy to find these steps. So I’m listing it here for my future reference and to hopefully help others looking for this process.
Simply download the the updated definitions here: http://data.mbamupdates.com/tools/mbam-rules.exe
Then copy the file over to the system you want to update and run it. Walla!
I am a Color Runner
Let me just say, The Color Run was one of the funnest things I have ever done. You don’t know what The Color Run is? That’s ok, about 6 months ago I didn’t either. First, a little back story on me. A couple of years ago I decided I wanted to get in shape, and as part of that, I wanted to run a complete 5k. But even though I was working out consistently, I kept making excuses not to start running. My big excuse was that I was too heavy and I would start running when I reached 175 pounds. Finally at some point I just said screw it, and started doing some running. Good thing too, as of this writing I still haven’t reached 175 pounds (very close though). Since I’ve started running, I’ve signed up for and competed in in quite a few 5k’s. But I have yet to ever run the complete 5k. I like the feeling of accomplishment when I complete a run, but I do find running to be very boring and sometimes it’s hard to keep going just because of that.
Ok, back on track, earlier this year I was listening to a Racine radio station and they talked about an upcoming event called The Color Run. Frankly I didn’t think too much of it and I chose to pretty much ignore it. It came and went, and afterwards, like always, I was more interested in it. After doing more research on it and seeing some photos from the Racine event, I thought ‘Damn, that really looked like fun. I hope it comes back next year because I will for sure run it’. And according to their schedule it is suppose to be back in 2013 and I will be there for sure. However, a couple of months later I saw a post from a friend on the facebook, looking to form a team for the Milwaukee Color Run in August. Holy Crap, are you kidding me!!!??! There was no way I was going to miss it. Because Color Runs pretty much sell out every time, I was sure to register the very second I could.
The event itself, even before the run is a spectacle. It was held at Miller Park (home to the Brewers) in Milwaukee Wisconsin. And good thing, because they needed room for the 10,000 runners to park, run, and party afterwards. What I found interesting though was it was not a timed event. That’s ok with me, because I time every run on my own. It took awhile before we were able to even start the run as they would only let off waves of about 1,000 runners every 10 minutes. But the whole time you are waiting there is a DJ and loud pop music blasting to keep everyone entertained. Once the run started you would go though a different color station approximately every 1k. You haven’t seen nothing until you’ve seen the approaching colorful cloud. It was just too cool. I wish I would have taken pictures during the run, but I was too focused on the actual run. I did take some video though as I ran through one of the color stations. Like I expected, I did not run this complete event. But I did run most of it. I stopped to walk only twice. Once for a big uphill climb, and the other because the patch narrowed to go under the highway and it got really jammed up with runners. According to my gps running app, I went a total distance of 2.93 mile (short of 5k) in 39:30. Not a stellar time by any stretch, but I didn’t care, I just had completed the funnest run of my life. I was completely covered in colors, and I simply had a blast.
After the finish, then it’s just about the party. They had a stage set up playing all that pop music that the kids seem to like, and every 15 minutes to would do a color launch where everyone throws a different color in the air at the same time. I sat through three of those! :) Once just to watch for myself, another to capture on video, and lastly one to participate and throw my color in to the air. Have I mentioned how much fun it was yet?? If I had any complaint, it would only be that the Milwaukee event was held at night, and all the color launching just didn’t have the same effect as it would have during the day.
Do you understand what the Color Run is yet? If it comes to an area around you, it is very much worth it to experience it. You do not even have to be a runner. There were plenty of people there that walked the entire course. And it is family friendly. I’ve already to talked to my kids about it and as of right now, 2 of the 3 want to do the next one with me. I’m all for it, but because I plan to run it, I will be getting them ready beforehand with plenty of training and running.
Opening an HP ProBook 4530s
Recently I had to deploy a brand new HP ProBook 4530s to a customer. But first I had to add more memory. When I flipped it over, I was concerned to not see any screws or access panels that I could remove. After a quick google search, I learned that pretty much the whole bottom comes off to open up a lot of the components. I thought this was pretty nice, so I created this quick video to demonstrate the procedure to remove this panel. Once removed, you have easy access to memory, hard drive and the wireless card.
Outlook 2011 on Mac create a new profile
I have a client the bought a new laptop and went with an Apple Mac Book Pro instead of sticking with Windows. He also had Office 2011 installed on it. Office 2011 on Mac no longer includes Entourage, but instead has introduced Outlook. The client initially configured email, but was having an issue with it pulling mail. That’s where I was called in to help. Now in Windows, I will normally create a new profile and configure it myself to make sure all the settings are correct. However, I could not find anywhere to create a new profile on the Mac. After some research, here’s what I found out.
The functionality I was looking for does indeed exist on the Mac, it’s just not called the same thing or located anywhere similar to that of a Windows PC. Outlook on Mac uses Identities. You simply need to create a new Identity. After a bit of googling, I found this article, which gave me the information I was looking for. I found that the location for the Microsoft Database Utility was just a bit different that listed in that post.
Simply put, to create a new Identity, you use an app called Microsoft Database Utility. That app was located here for me: Finder > Applications > Microsoft Office 2011 > Office > Microsoft Database Utility.

Just click the plus in the lower left, name the new identity, and then you can set it as the default by pressing the gear in the lower left of the box. Now when you open Outlook 2011 it will open using the new profile.